Featured
My solar-powered and self-hosted website
How I built a solar-powered, self-hosted website with a Raspberry Pi to explore sustainable, local-first web hosting.
Contents
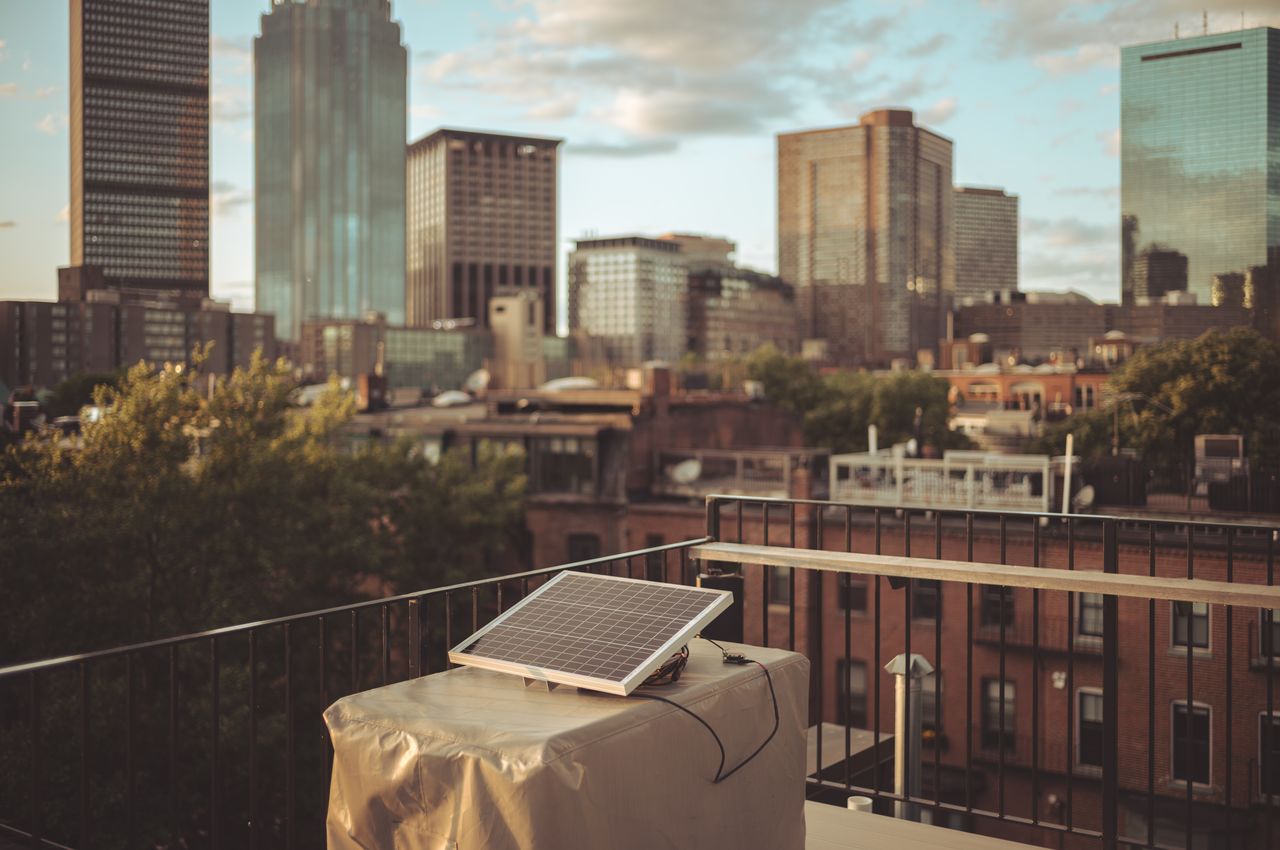
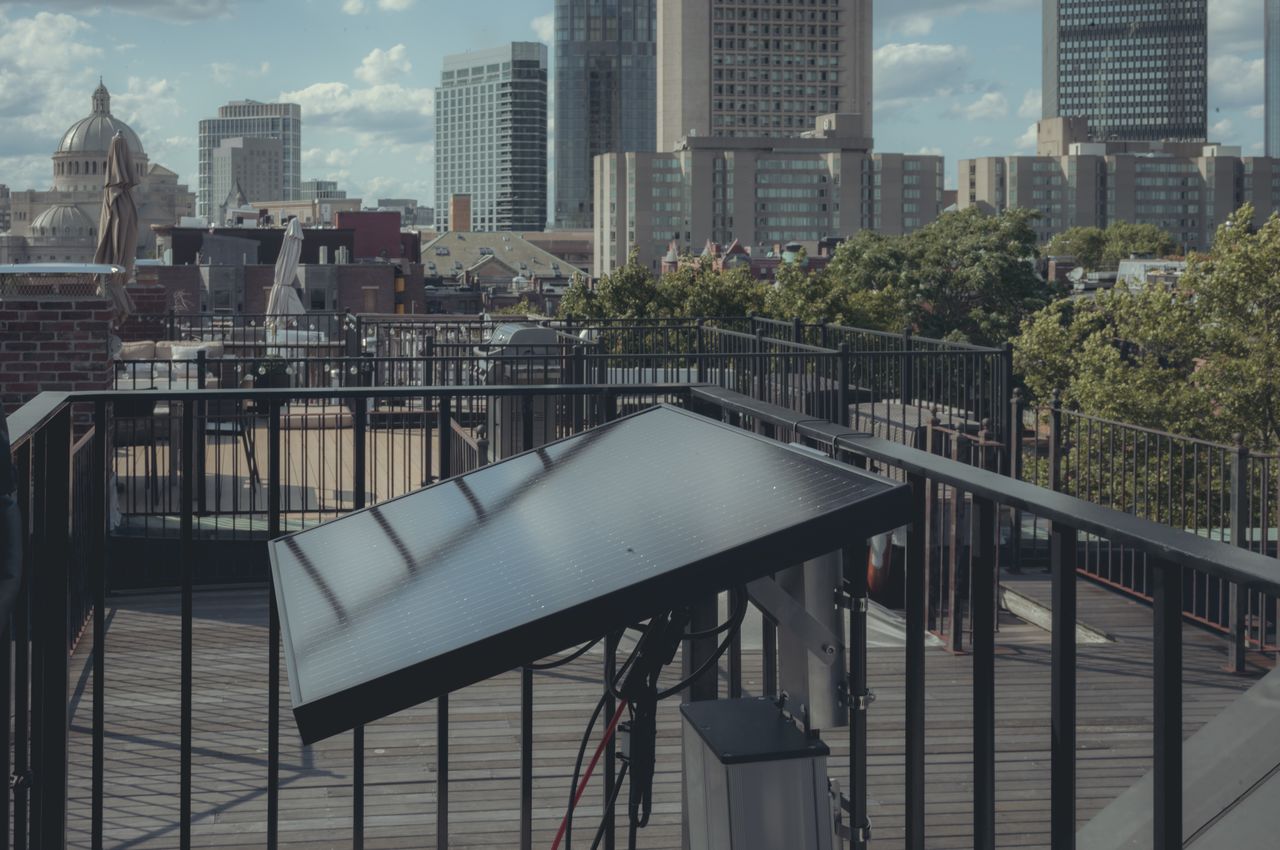
I'm excited to share an experiment I've been working on: a solar-powered, self-hosted website running on a Raspberry Pi. The website at https://solar.dri.es is powered entirely by a solar panel and battery on our roof deck in Boston.
By visiting https://solar.dri.es, you can dive into all the technical details and lessons learned – from hardware setup to networking configuration and custom monitoring.
As the content on this solar-powered site is likely to evolve or might even disappear over time, I've included the full article below (with minor edits) to ensure that this information is preserved.
Finally, you can view the real-time status of my solar setup on my solar panel dashboard, hosted on my main website. This dashboard stays online even when my solar-powered setup goes offline.
§Background
For over two decades, I've been deeply involved in web development. I've worked on everything from simple websites to building and managing some of the internet's largest websites. I've helped create a hosting business that uses thousands of EC2 instances, handling billions of page views every month. This platform includes the latest technology: cloud-native architecture, Kubernetes orchestration, auto-scaling, smart traffic routing, geographic failover, self-healing, and more.
This project is the complete opposite. It's a hobby project focused on sustainable, solar-powered self-hosting. The goal is to use the smallest, most energy-efficient setup possible, even if it means the website goes offline sometimes. Yes, this site may go down on cloudy or cold days. But don't worry! When the sun comes out, the website will be back up, powered by sunshine.
My primary website, https://dri.es, is reliably hosted on Acquia, and I'm very happy with it. However, if this solar-powered setup proves stable and efficient, I might consider moving some content to solar hosting. For instance, I could keep the most important pages on traditional hosting while transferring less essential content – like my 10,000 photos – to a solar-powered server.
§Why am I doing this?
This project is driven by my curiosity about making websites and web hosting more environmentally friendly, even on a small scale. It's also a chance to explore a local-first approach: to show that hosting a personal website on your own internet connection at home can often be enough for small sites. This aligns with my commitment to both the Open Web and the IndieWeb.
At its heart, this project is about learning and contributing to a conversation on a greener, local-first future for the web. Inspired by solar-powered sites like LowTech Magazine, I hope to spark similar ideas in others. If this experiment inspires even one person in the web community to rethink hosting and sustainability, I'll consider it a success.
§Solar panel and battery
The heart of my solar setup is a 50-watt panel from Voltaic, which captures solar energy and delivers 12-volt output. I store the excess power in an 18 amp-hour Lithium Iron Phosphate (LFP or LiFePO4) battery, also from Voltaic.

I'll never forget the first time I plugged in the solar panel – it felt like pure magic. Seeing the battery spring to life, powered entirely by sunlight, was an exhilarating moment that is hard to put into words. And yes, all this electrifying excitement happened right in our laundry room.
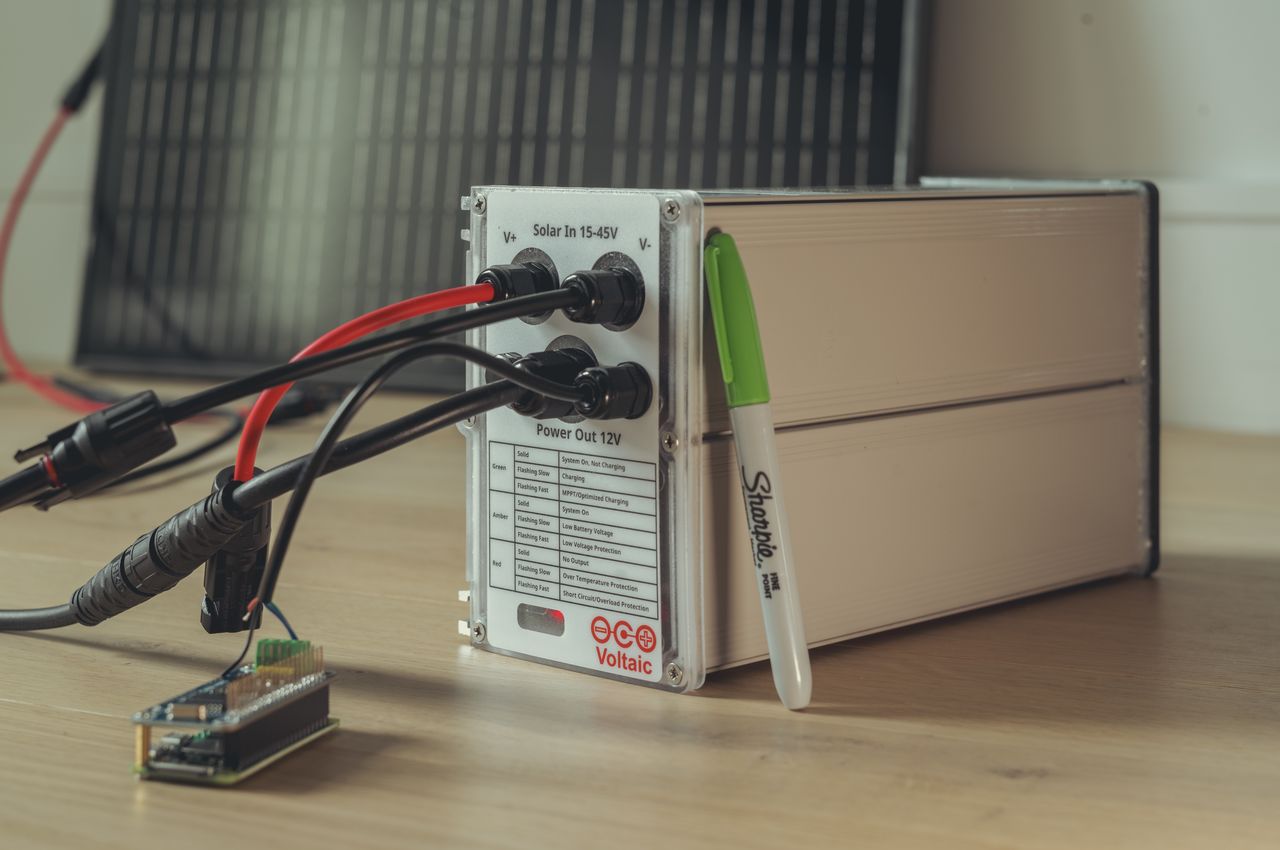
Voltaic's battery system includes a built-in charge controller with Maximum Power Point Tracking (MPPT) technology, which regulates the solar panel's output to optimize battery charging. In addition, the MPPT controller protects the battery from overcharging, extreme temperatures, and short circuits.
A key feature of the charge controller is its ability to stop charging when temperatures fall below 0°C (32°F). This preserves battery health, as charging in freezing conditions can damage the battery cells. As I'll discuss in the Next steps section, this safeguard complicates year-round operation in Boston's harsh winters. I'll likely need a battery that can charge in colder temperatures.
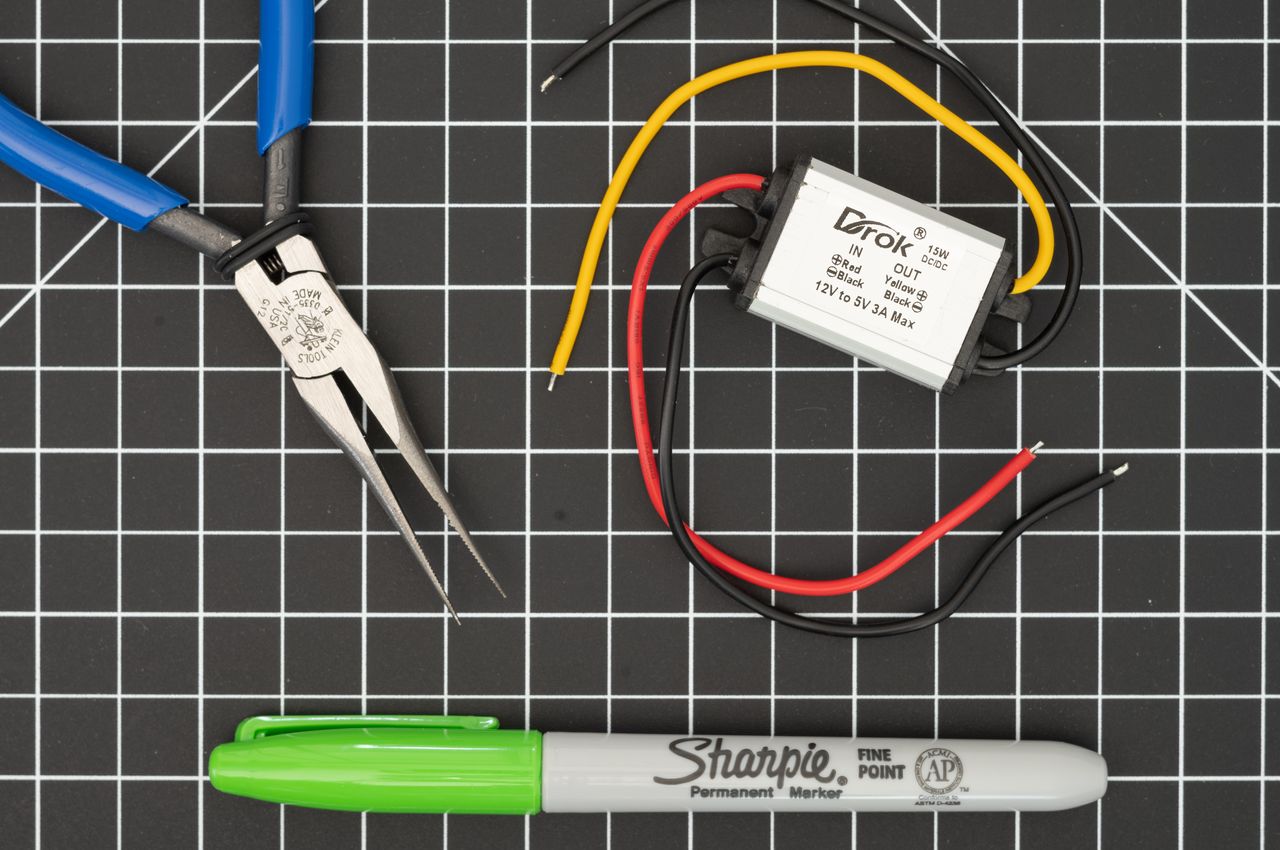
I also encountered a voltage mismatch between the 12-volt solar panel output and the Raspberry Pi's 5-volt input requirement. Fortunately, this problem had a more straightforward solution. I solved this using a buck converter to step down the voltage. While this conversion introduces some energy loss, it allows me to use a more powerful solar panel.
§Raspberry Pi models
This website is currently hosted on a Raspberry Pi Zero 2 W. The main reason for choosing the Raspberry Pi Zero 2 W is its energy efficiency. Consuming just 0.4 watts at idle and up to 1.3 watts under load, it can run on my battery for about a week. This decision is supported by a mathematical uptime model, detailed in Appendix 1.
That said, the Raspberry Pi Zero 2 W has limitations. Despite its quad-core 1 GHz processor and 512 MB of RAM, it may still struggle with handling heavier website traffic. For this reason, I also considered the Raspberry Pi 4. With its 1.5 GHz quad-core ARM processor and 4 GB of RAM, the Raspberry Pi 4 can handle more traffic. However, this added performance comes at a cost: the Pi 4 consumes roughly five times the power of the Zero 2 W. As shown in Appendix 2, my 50W solar panel and 18Ah battery setup are likely insufficient to power the Raspberry Pi 4 through Boston's winter.
With a single-page website now live on https://solar.dri.es, I'm actively monitoring the real-world performance and uptime of a solar-powered Raspberry Pi Zero 2 W. For now, I'm using the lightest setup that I have available and will upgrade only when needed.
§Networking
The Raspberry Pi's built-in Wi-Fi is perfect for our outdoor setup. It wirelessly connects to our home network, so no extra wiring was needed.
I want to call out that my router and Wi-Fi network are not solar-powered; they rely on my existing network setup and conventional power sources. So while the web server itself runs on solar power, other parts of the delivery chain still depend on traditional energy.
Running this website on my home internet connection also means that if my ISP or networking equipment goes down, so does the website – there is no failover in place.
For security reasons, I isolated the Raspberry Pi in its own Virtual Local Area Network (VLAN). This ensures that even if the Pi is compromised, the rest of our home network remains protected.
To make the solar-powered website accessible from the internet, I configured port forwarding on our router. This directs incoming web traffic on port 80 (HTTP) and port 443 (HTTPS) to the Raspberry Pi, enabling external access to the site.
One small challenge was the dynamic nature of our IP address. ISPs typically do not assign fixed IP addresses, meaning our IP address changes from time to time. To keep the website accessible despite these IP address changes, I wrote a small script that looks up our public IP address and updates the DNS record for solar.dri.es on Cloudflare. This script runs every 10 minutes via a cron job.
I use Cloudflare's DNS proxy, which handles DNS and offers basic DDoS protection. However, I do not use Cloudflare's caching or CDN features, as that would somewhat defeat the purpose of running this website on solar power and keeping it local-first.
The Raspberry Pi uses Caddy as its web server, which automatically obtains SSL certificates from Let's Encrypt. This setup ensures secure, encrypted HTTP connections to the website.
§Monitoring and dashboard
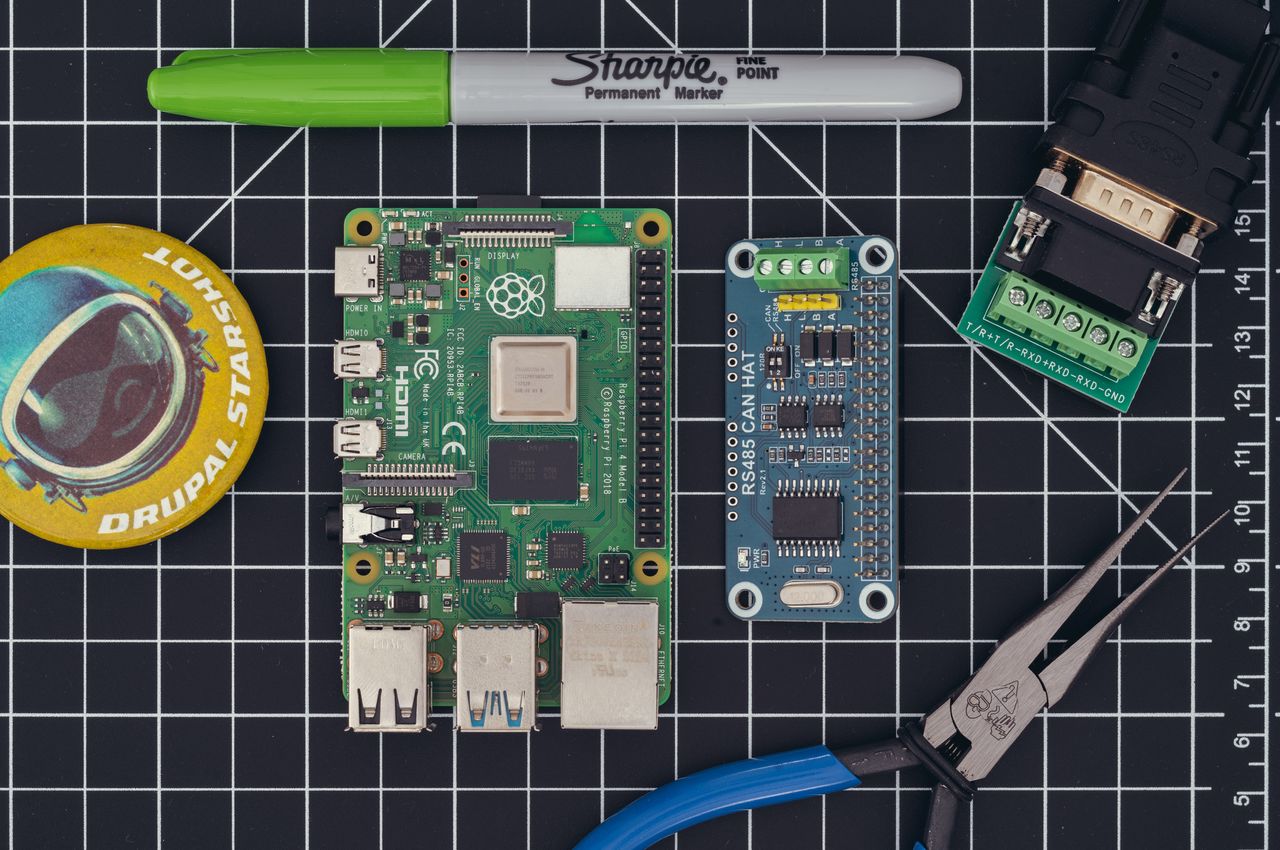
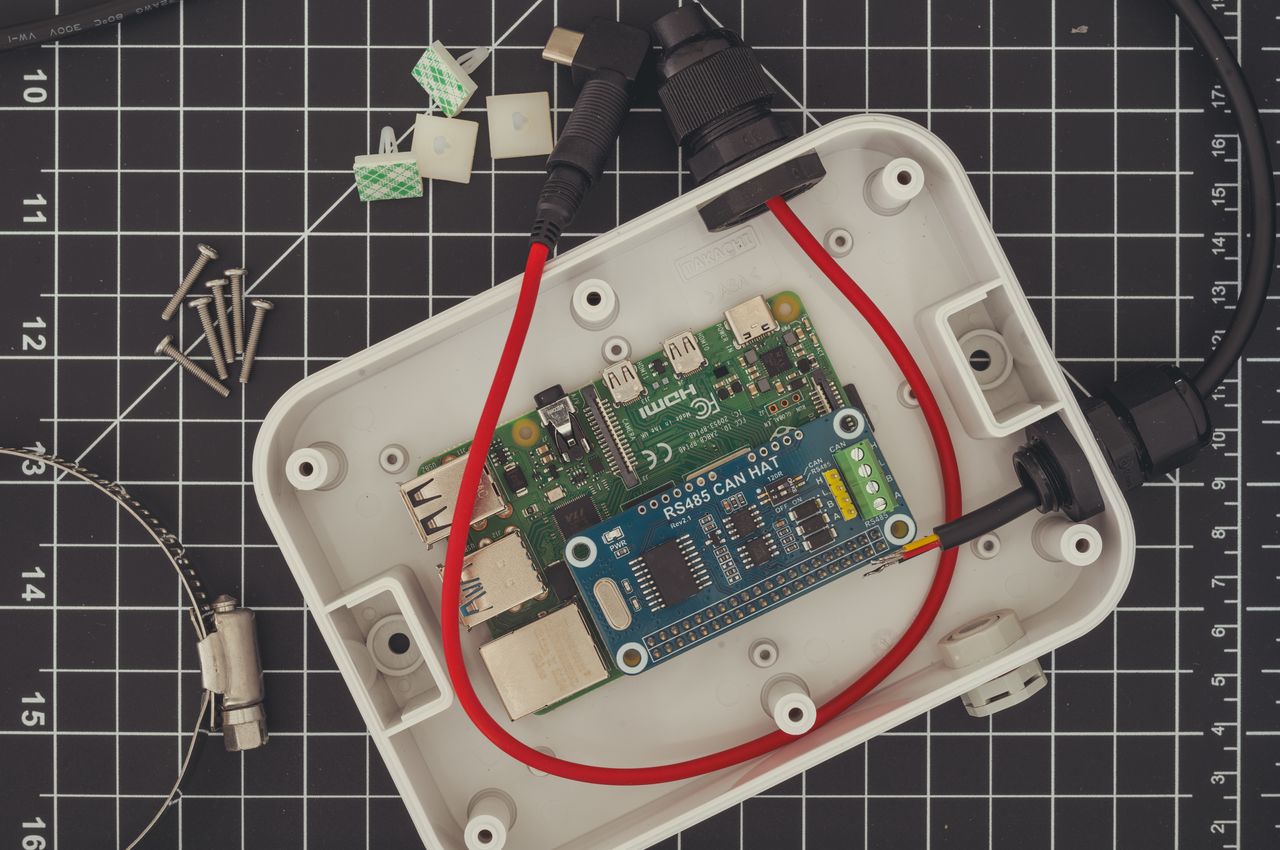
One key feature that influenced my decision to go with the Voltaic battery is its RS485 interface for the charge controller. This allowed me to add an RS485 CAN HAT (Hardware Attached on Top) to the Raspberry Pi, enabling communication with the charge controller using the Modbus protocol. In turn, this enabled me to programmatically gather real-time data on the solar panel's output and battery's status.
I collect data such as battery capacity, power output, temperature, uptime, and more. I send this data to my main website via a web service API, where it's displayed on a dashboard. This setup ensures that key information remains accessible, even if the Raspberry Pi goes offline.
My main website runs on Drupal. The dashboard is powered by a custom module I developed. This module adds a web service endpoint to handle authentication, validate incoming JSON data, and store it in a MariaDB database table. Using the historical data stored in MariaDB, the module generates Scalable Vector Graphics (SVGs) for the dashboard graphs. For more details, check out my post on building a temperature and humidity monitor, which explains a similar setup in much more detail. Sure, I could have used a tool like Grafana, but sometimes building it yourself is part of the fun.
For more details on the charge controller and some of the issues I've observed, please refer to Appendix 3.
§Energy use, cost savings, and environmental impact
When I started this solar-powered website project, I wasn't trying to revolutionize sustainable computing or drastically cut my electricity bill. I was driven by curiosity, a desire to have fun, and a hope that my journey might inspire others to explore local-first or solar-powered hosting.
That said, let's break down the energy consumption and cost savings to get a better sense of the project's impact.
The tiny Raspberry Pi Zero 2 W at the heart of this project uses just 1 Watt on average. This translates to 0.024 kWh daily (1W * 24h / 1000 = 0.024 kWh) and approximately 9 kWh annually (0.024 kWh * 365 days = 8.76 kWh). The cost savings? Looking at our last electricity bill, we pay an average of $0.325 per kWh in Boston. This means the savings amount to $2.85 USD per year (8.76 kWh * $0.325/kWh = $2.85). Not exactly something to write home about.
The environmental impact is similarly modest. Saving 9 kWh per year reduces CO2 emissions by roughly 4 kg, which is about the same as driving 16 kilometers (10 miles) by car.
There are two ways to interpret these numbers. The pessimist might say that the impact of my solar setup is negligible, and they wouldn't be wrong. Offsetting the energy use of a Raspberry Pi Zero 2, which only draws 1 Watt, will never be game-changing. The $2.85 USD saved annually won't come close to covering the cost of the solar panel and battery. In terms of efficiency, this setup isn't a win.
But the optimist in me sees it differently. When you compare my solar-powered setup to traditional website hosting, a more compelling case emerges. Using a low-power Raspberry Pi to host a basic website, rather than large servers in energy-hungry data centers, can greatly cut down on both expenses and environmental impact. Consider this: a Raspberry Pi Zero 2 W costs just $15 USD, and I can power it with main power for only $0.50 USD a month. In contrast, traditional hosting might cost around $20 USD a month. Viewed this way, my setup is both more sustainable and economical, showing some merit.
Lastly, it's also important to remember that solar power isn't just about saving money or cutting emissions. In remote areas without grid access or during disaster relief, solar can be the only way to keep communication systems running. In a crisis, a small solar setup could make the difference between isolation and staying connected to essential information and support.
§Why do so many websites need to stay up?
The reason the energy savings from my solar-powered setup won't offset the equipment costs is that the system is intentionally oversized to keep the website running during extended low-light periods. Once the battery reaches full capacity, any excess energy goes to waste. That is unfortunate as that surplus could be used, and using it would help offset more of the hardware costs.
This inefficiency isn't unique to solar setups – it highlights a bigger issue in web hosting: over-provisioning. The web hosting world is full of mostly idle hardware. Web hosting providers often allocate more resources than necessary to ensure high uptime or failover, and this comes at an environmental cost.
One way to make web hosting more eco-friendly is by allowing non-essential websites to experience more downtime, reducing the need to power as much hardware. Of course, many websites are critical and need to stay up 24/7 – my own work with Acquia is dedicated to ensuring essential sites do just that. But for non-critical websites, allowing some downtime could go a long way in conserving energy.
It may seem unconventional, but I believe it's worth considering: many websites, mine included, aren't mission-critical. The world won't end if they occasionally go offline. That is why I like the idea of hosting my 10,000 photos on a solar-powered Raspberry Pi.
And maybe that is the real takeaway from this experiment so far: to question why our websites and hosting solutions have become so resource-intensive and why we're so focused on keeping non-essential websites from going down. Do we really need 99.9% uptime for personal websites? I don't think so.
Perhaps the best way to make the web more sustainable is to accept more downtime for those websites that aren't critical. By embracing occasional downtime and intentionally under-provisioning non-essential websites, we can make the web a greener, more efficient place.
§Next steps
As I continue this experiment, my biggest challenge is the battery's inability to charge in freezing temperatures. As explained, the battery's charge controller includes a safety feature that prevents charging when the temperature drops below freezing. While the Raspberry Pi Zero 2 W can run on my fully charged battery for about six days, this won't be sufficient for Boston winters, where temperatures often remain below freezing for longer.
With winter approaching, I need a solution to charge my battery in extreme cold. Several options to consider include:
- Adding a battery heating system that uses excess energy during peak sunlight hours.
- Applying insulation, though this alone may not suffice since the battery generates minimal heat.
- Replacing the battery with one that charges at temperatures as low as -20°C (-4°F), such as Lithium Titanate (LTO) or certain AGM lead-acid batteries. However, it's not as simple as swapping it out – my current battery has a built-in charge controller, so I'd likely need to add an external charge controller, which would require rewiring the solar panel and updating my monitoring code.
Each solution has trade-offs in cost, safety, and complexity. I'll need to research the different options carefully to ensure safety and reliability.
The last quarter of the year is filled with travel and other commitments, so I may not have time to implement a fix before freezing temperatures hit. With some luck, the current setup might make it through winter. I'll keep monitoring performance and uptime – and, as mentioned, a bit of downtime is acceptable and even part of the fun! That said, the website may go offline for a few weeks and restart after the harshest part of winter. Meanwhile, I can focus on other aspects of the project.
For example, I plan to expand this single-page site into one with hundreds or even thousands of pages. Here are a few things I'd like to explore:
- Testing Drupal on a Raspberry Pi Zero 2 W: As the founder and project lead of Drupal, my main website runs on Drupal. I'm curious to see if Drupal can actually run on a Raspberry Pi Zero 2 W. The answer might be "probably not", but I'm eager to try.
- Upgrading to a Raspberry Pi 4 or 5: I'd like to experiment with upgrading to a Raspberry Pi 4 or 5, as I know it could run Drupal. As noted in Appendix 2, this might push the limits of my solar panel and battery. There are some optimization options to explore though, like disabling CPU cores, lowering the RAM clock speed, and dynamically adjusting features based on sunlight and battery levels.
- Creating a static version of my site: I'm interested in experimenting with a static version of https://dri.es. A static site doesn't require PHP or MySQL, which would likely reduce resource demands and make it easier to run on a Raspberry Pi Zero 2 W. However, dynamic features like my solar dashboard depend on PHP and MySQL, so I'd potentially need alternative solutions for those. Tools like Tome and QuantCDN offer ways to generate static versions of Drupal sites, but I've never tested these myself. Although I prefer keeping my site dynamic, creating a static version also aligns with my interests in digital preservation and archiving, offering me a chance to delve deeper into these concepts.
Either way, it looks like I'll have some fun ahead. I can explore these ideas from my office while the Raspberry Pi Zero 2 W continues running on the roof deck. I'm open to suggestions and happy to share notes with others interested in similar projects. If you'd like to stay updated on my progress, you can sign up to receive new posts by email or subscribe via RSS. Feel free to email me at dries@buytaert.net. Your ideas, input, and curiosity are always welcome.
§Appendix
§Appendix 1: Sizing a solar panel and battery for a Raspberry Pi Zero 2 W
To keep the Raspberry Pi Zero 2 W running in various weather conditions, we need to estimate the ideal solar panel and battery size. We'll base this on factors like power consumption, available sunlight, and desired uptime.
The Raspberry Pi Zero 2 W is very energy-efficient, consuming only 0.4W at idle and up to 1.3W under load. For simplicity, we'll assume an average power consumption of 1W, which totals 24Wh per day (1W * 24 hours).
We also need to account for energy losses due to inefficiencies in the solar panel, charge controller, battery, and inverter. Assuming a total loss of 30%, our estimated daily energy requirement is 24Wh / 0.7 ≈ 34.3Wh.
In Boston, peak sunlight varies throughout the year, averaging 5-6 hours per day in summer (June-August) and only 2-3 hours per day in winter (December-February). Peak sunlight refers to the strongest, most direct sunlight hours. Basing the design on peak sunlight hours rather than total daylight hours provides a margin of safety.
To produce 34.3Wh in the winter, with only 2 hours of peak sunlight, the solar panel should generate about 17.15W (34.3Wh / 2 hours ≈ 17.15W). As mentioned, my current setup includes a 50W solar panel, which provides well above the estimated 17.15W requirement.
Now, let's look at battery sizing. As explained, I have an 18Ah battery, which provides about 216Wh of capacity (18Ah * 12V = 216Wh). If there were no sunlight at all, this battery could power the Raspberry Pi Zero 2 W for roughly 6 days (216Wh / 34.3Wh per day ≈ 6.3 days), ensuring continuous operation even on snowy winter days.
These estimates suggest that I could halve both my 50W solar panel and 18Ah battery to a 25W panel and a 9Ah battery, and still meet the Raspberry Pi Zero 2 W's power needs during Boston winters. However, I chose the 50W panel and larger battery for flexibility, in case I need to upgrade to a more powerful board with higher energy requirements.
§Appendix 2: Sizing a solar panel and battery for a Raspberry Pi 4
If I need to switch to a Raspberry Pi 4 to handle increased website traffic, the power requirements will rise significantly. The Raspberry Pi 4 consumes around 3.4W at idle and up to 7.6W under load. For estimation purposes, I'll assume an average consumption of 4.5W, which totals 108Wh per day (4.5W * 24 hours = 108Wh).
Factoring in a 30% loss due to system inefficiencies, the adjusted daily energy requirement increases to approximately 154.3Wh (108Wh / 0.7 ≈ 154.3Wh). To meet this demand during winter, with only 2 hours of peak sunlight, the solar panel would need to produce about 77.15W (154.3Wh / 2 hours ≈ 77.15W).
While some margin of safety is built into my calculations, this likely means my current 50W solar panel and 216Wh battery are insufficient to power a Raspberry Pi 4 during a Boston winter.
For example, with an average power draw of 4.5W, the Raspberry Pi 4 requires 108Wh daily. In winter, if the solar panel generates only 70 to 105Wh per day, there would be a shortfall of 3 to 38Wh each day, which the battery would need to cover. And with no sunlight at all, a fully charged 216Wh battery would keep the system running for about 2 days (216Wh / 108Wh per day ≈ 2 days) before depleting.
To ensure reliable operation, a 100W solar panel, capable of generating enough power with just 2 hours of winter sunlight, paired with a 35Ah battery providing 420Wh, could be better. This setup, roughly double my current capacity, would offer sufficient backup to keep the Raspberry Pi 4 running for 3-4 days without sunlight.
§Appendix 3: Observations on the Lumiax charge controller
As I mentioned earlier, my battery has a built-in charge controller. The brand of the controller is Lumiax, and I can access its data programmatically. While the controller excels at managing charging, its metering capabilities feel less robust. Here are a few observations:
- I reviewed the charge controller's manual to clarify how it defines and measures different currents, but the information provided was insufficient.
- The charge controller allows monitoring of the "solar current" (register
12367). I expected this to measure the current flowing from the solar panel to the charge controller, but it actually measures the current flowing from the charge controller to the battery. In other words, it tracks the "useful current" – the current from the solar panel used to charge the battery or power the load. The problem with this is that when the battery is fully charged, the controller reduces the current from the solar panel to prevent overcharging, even though the panel could produce more. As a result, I can't accurately measure the maximum power output of the solar panel. For example, in full sunlight with a fully charged battery, the calculated power output could be as low as 2W, even though the solar panel is capable of producing 50W. - The controller also reports the "battery current" (register
12359), which appears to represent the current flowing from the battery to the Raspberry Pi. I believe this to be the case because the "battery current" turns negative at night, indicating discharge. - Additionally, the controller reports the "load current" (register
12362), which, in my case, consistently reads zero. This is odd because my Raspberry Pi Zero 2 typically draws between 0.1-0.3A. Even with a Raspberry Pi 4, drawing between 0.6-1.3A, the controller still reports 0A. This could be a bug or suggest that the charge controller lacks sufficient accuracy.
- When the battery discharges and the low voltage protection activates, it shuts down the Raspberry Pi as expected. However, if there isn't enough sunlight to recharge the battery within a certain timeframe, the Raspberry Pi does not automatically reboot. Instead, I must perform a manual 'factory reset' of the charge controller. This involves connecting my laptop to the controller – a cumbersome process that requires me to disconnect the Raspberry Pi, open its waterproof enclosure, detach the RS485 hat wires, connect them to a USB-to-RS485 adapter for my laptop, and run a custom Python script. Afterward, I have to reverse the entire process. This procedure can't be performed while traveling as it requires physical access.
- The charge controller has two temperature sensors: one for the environment and one for the controller itself. However, the controller's temperature readings often seem inaccurate. For example, while the environment temperature might correctly register at 24°C, the controller could display a reading as low as 14°C. This seems questionable though there might be an explanation that I'm overlooking.
- The battery's charge and discharge patterns are non-linear, meaning the charge level may drop rapidly at first, then stay steady for hours. For example, I've seen it drop from 100% to 65% within an hour but remain at 65% for over six hours. This is common for LFP batteries due to their voltage characteristics. Some advanced charge controllers use look-up tables, algorithms, or coulomb counting to more accurately predict the state of charge based on the battery type and usage patterns. The Lumiax doesn't support this, but I might be able to implement coulomb counting myself by tracking the current flow to improve charge level estimates.
§Appendix 4: When size matters (but it's best not to mention it)
When buying a solar panel, sometimes it's easier to beg for forgiveness than to ask for permission.
One day, I casually mentioned to my wife, "Oh, by the way, I bought something. It will arrive in a few days."
"What did you buy?", she asked, eyebrow raised.
"A solar panel", I said, trying to sound casual.
"A what?!", she asked again, her voice rising.
Don't worry!", I reassured her. "It's not that big", I said, gesturing with my hands to show a panel about the size of a laptop.
She looked skeptical but didn't push further.
Fast forward to delivery day. As I unboxed it, her eyes widened in surprise. The panel was easily four or five times larger than what I'd shown her. Oops.
The takeaway? Sometimes a little underestimation goes a long way.
Join 5,000+ readers. I'm the creator of Drupal and co-founder of Acquia. I write about Open Source, AI, and the future of the web, with a focus on building, scaling, and thinking long-term.